Thursday 28 February 2019

How to Unlock iPad without Passcode


1 Unlock iPad without Passcode with iTunes

Here we will show you how to unlock the iPad by using iTunes which is quite possible to do for all iOS users because they are already familiar with.


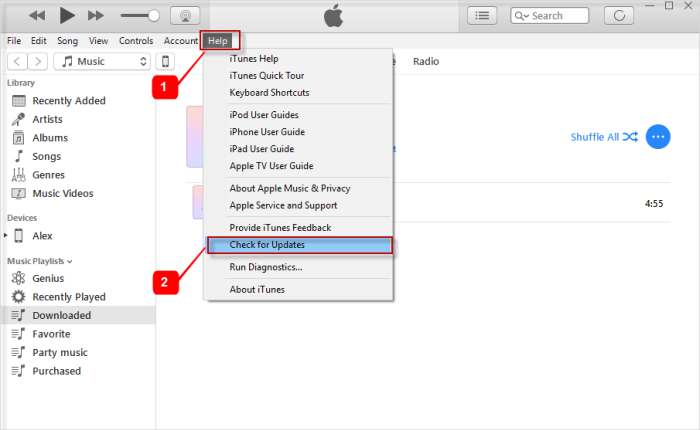
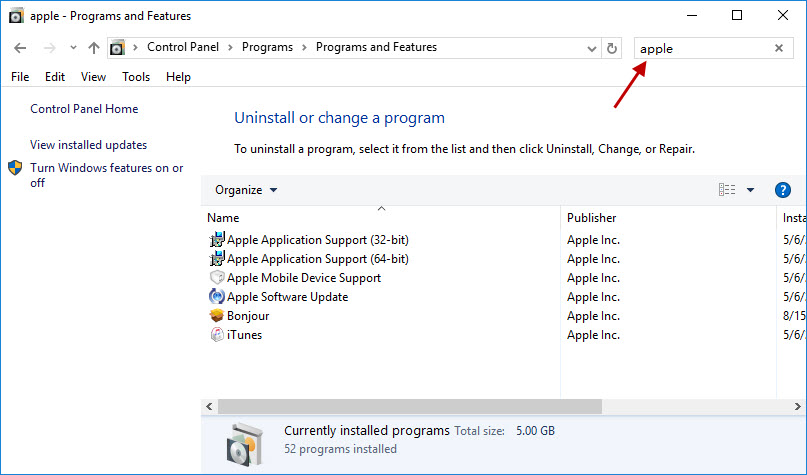
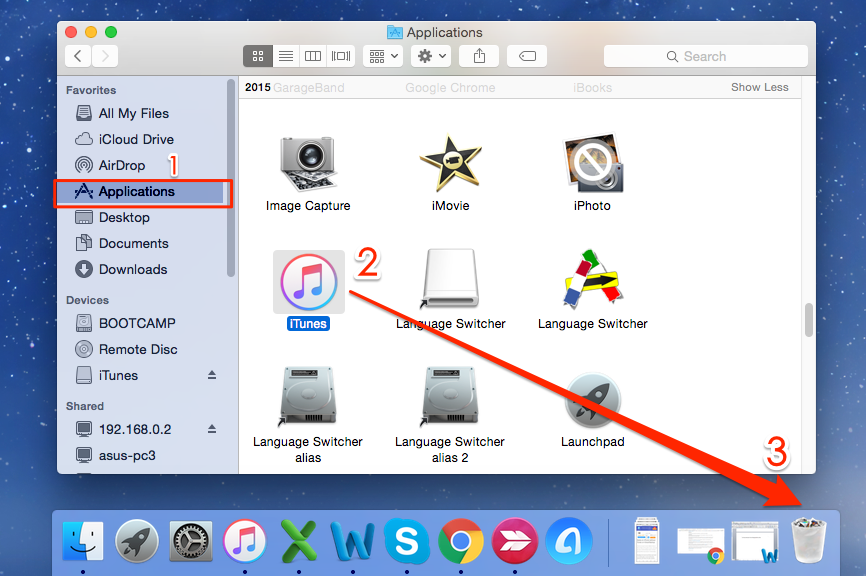
Begin by launching the latest version of your iTunes which is on mac or windows that depend on the platform that you are using, if you don’t have the latest version of iTunes go the download it.


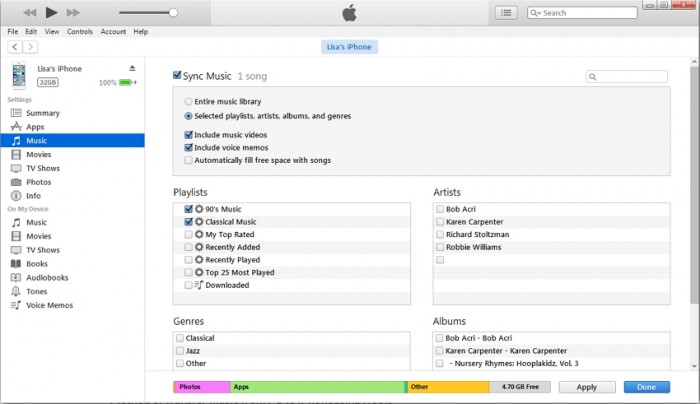
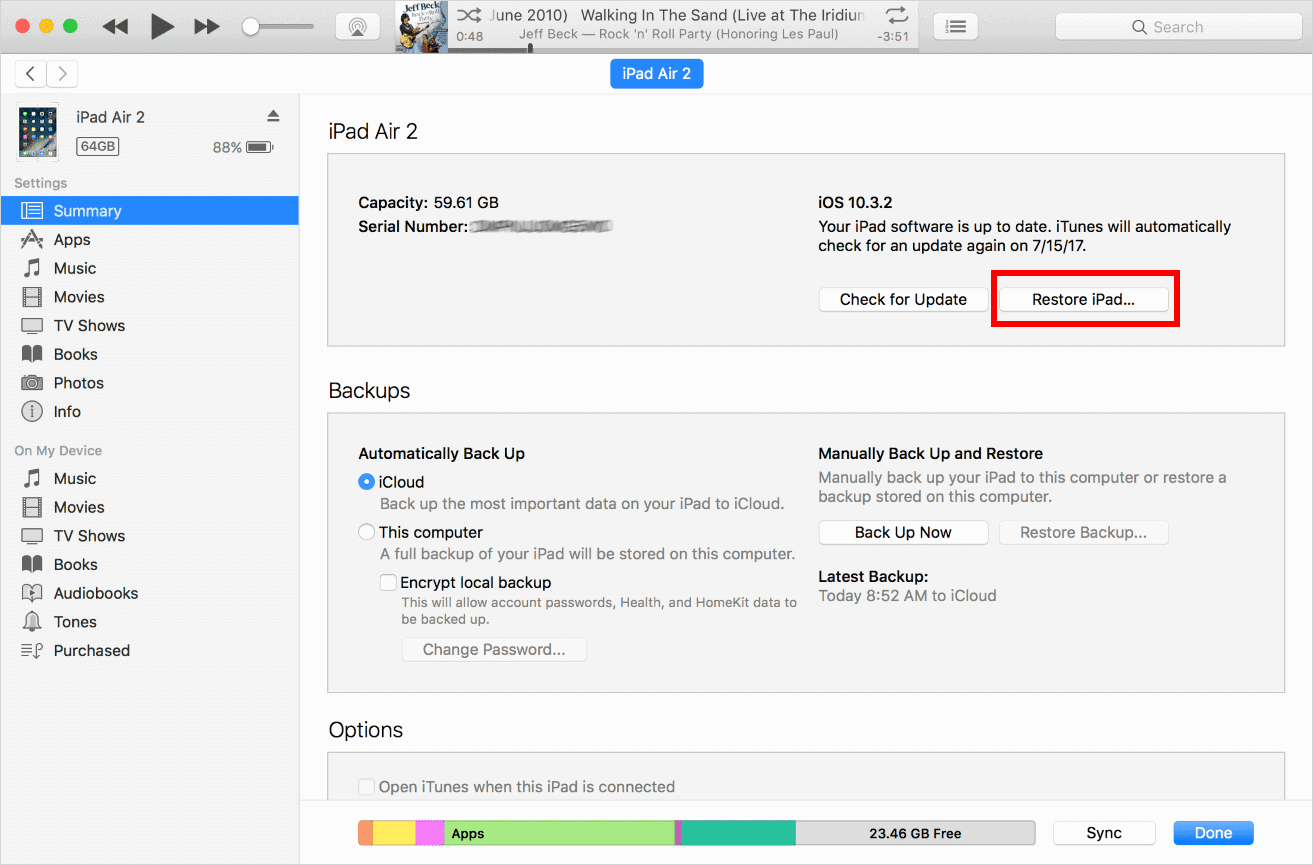
Your iPad will get detected by the iTunes, now you can select it from the devices section and then go to the Summary page


You should by able to see "Restore iPad" option which is available on the right side of the panel.


Just confirm your choice and wait for iPad to get restored.


2 Unlock iPad without Passcode using Find My iPhone

Apple introduced my iPad/iPhone application with only one purpose which is making it easier for the users to locate their device remotely. And by doing the following steps you can easily by able to unlock the iPad without passcode.


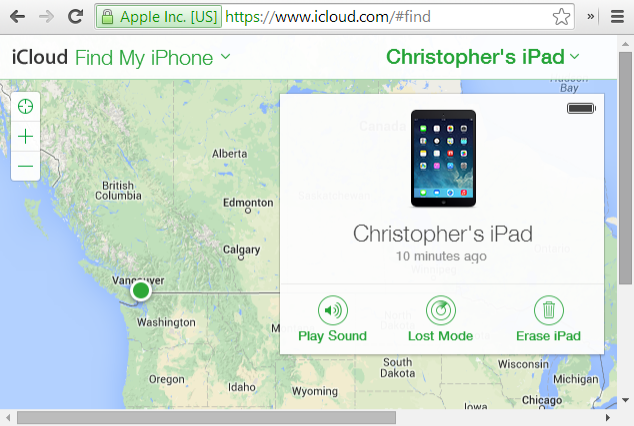
With your Apple ID you should go to iCloud website and log in. of course make sure that you use the same account which is associated with your iPad that you need to restore.


You will see the option of find phone through the welcome screen of iCloud.


Now you will see a new interface. Click on the all devices option in front of you and simply select your iPad.


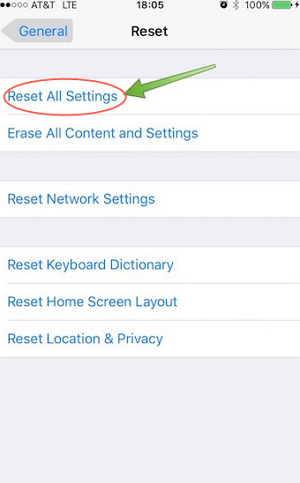
The options that associated with your iPad should now by available in front of you. And to unlock your device, click one "Erase iPad" button.


Wait for your iPad to be erased after conforming your choice.


3 Unlock iPad without Passcode in Recovery Mode

This is the last resort in front of you of none of the above-mentioned methods succeeded in unlocking the iPad which is very rare. Without a further do let’s get started.

1. Launch the latest version available on your computer or Mac.

2. You should turn off the device “iPad” and leave for a few seconds to rest.

3. By holding the power button and the home button at the same time you can put your iPad in the recovery mode. Just keep pressing the buttons for at least 10 seconds. Then you will see the apple logo on the screen.

4. By still holding the home button and letting go of the power button. Try to connect your iPad to the computer or mac depending on what you are using then it should display iTunes symbol


5. After connection your iPad to the iTunes. It will detect that your iPad is in the recovery mode.

6. A message will appear in front of you tells you that your iPad is detected in recovery mode and you should restore it before you can use it. Just click "OK" and it will be automatically recovered.


The best way on how to unlock iPad without passcode is to get help from iMyFone LockWiper, which can solve it within minutes. Even though there are other methods to unlock your iPad like using iTunes, iCloud or the Recovery mode, these are not recommended to users due to their limitations.

If you want to unlock your iPad safely and quickly, download iMyFone LockWiper Windows version or Mac version and let it handle the problem for you.Also Read:XD Card Recovery – Recover Deleted Photos from xD-Picture Card
Also Read:How to Convert SWF to MP4 on Mac or Windows
Also Read:7 Best iPhone Photo Editor Apps To Achieve Filter and Psychedelic Look
Also Read:5 Best Free Movie Streaming Sites like Pubfilm to Watch Movies Online 2019

How to Send Ringtones to iPhone through Email?


How to Send Ringtones to iPhone through Email?

Every iPhone user would welcome the idea of having a perfect alternative that allows them send ringtones to their iPhone – whether it is from their computer or another iPhone. Although sending ringtones via email is an old transfer method, it is still a substitute platform to escape the hassles of only making use of iTunes on your iPhone. To achieve this, here are a few detailed, yet practical steps.
From iPhone to iPhoneSponsor ads:Best iOS Emulator For Windows To Build & Run iOS Apps


Login to your email account.


Got to “Compose” to send a new e-mail and make yourself the recipient of the mail. Before saving or downloading the file, first ensure it is in M4R format. Click on your preferred ringtone file and save the file by downloading it.


Go to the ringtone file you want to set on your iPhone, upload it as an attachment, and send the e-mail.


Sign into your email account on your iPhone and download the attached file.
From computer to iPhone


Go to your browser and sing into your email account from your computer.


Connect your phone to your computer with a USB cord and open iTunes on your device.


Go to the folder where you already saved the ringtone file and move it to the iTunes Library section at the upper left hand corner of your computer. Ensure the ringtone file is moved to the “tones” subcategory.


Move the ringtone file from iTunes to the “Devices” section of your iPhone. Your selected ringtone will automatically sync to your iPhone immediately the file is moved.


All in all, iMyFone TunesMate is a perfect alternative to the email method to send ringtones to iPhone.


Sponsor ads:

Gihosoft Free iPhone Data Recovery:https://www.gihosoft.com/iphone-data-recovery-free.html

Gihosoft iPhone Data Recovery Free

Free iPhone Data Recovery Software for Windows/Mac

Recover up to 12+ types of files, including contacts, SMS, photos, WhatsApp, Viber, notes, etc.

Restore lost data from iOS devices directly or from iTunes and iCloud backup

Recover iPhone data lost due to iOS upgrade/jailbreak, accidental deletion, device lost or broken

Support all the latest iPhone, iPad and iPod Touch

Both Free and Pro version.

If you lost data after you updated to a new iPhone, you can always use Gihosoft iPhone Data Recovery to get the data back from the old iPhone or backup.You may also like: iphonerecovery.com

If you use android phones, please choose Gihosoft Android Data Recovery.

With Gihosoft Android Data Recovery, no longer afraid of data loss!

Must read:Youtube video downloader for pc

Gihosoft RePicvid Free Photo Recovery Software provides a free photo recovery software for windows to help users recover the deleted or lost photo for free.

Jihosoft Android Data Recovery: the best Android Data Recovery software for Windows and Mac to recover deleted contacts, messages, photos, videos, WhatsApp and etc from Android devices.Tips:How to transfer messages from iPhone to iPhone


jihosoft Free iPhone Data Recovery

How to Permanently Delete Apps from iTunes On Mac

How to Permanently Delete Apps from iTunes On Mac

Deleting apps from iTunes is possible on Mac even if your iDevice is being synced. However, iTunes might tell you that there are some apps on your iDevice that aren’t on your Mac. Ignore this prompt and proceed to delete apps permanently from iTunes.

1. From iTunes

Follow these instructions:
Step 1: Open iTunes on your Mac.
Step 2: Navigate to Library > Apps.
Step 3: Now press Command-A or use Edit > Select All option and then control-click any part of your selection.
Step 4: Once the selection is completed, click Delete and then confirm your deletion.
Step 5: When prompted, choose the ‘Move to Trash’ option.
Step 6: Your selected apps will be deleted. You can then use Finder > Empty Trash option to empty the trash.
Delete Apps from iTunes On Mac


2. Delete from App Directory

It is also possible to delete apps permanently from itunes by manually navigating to the app directory of iTunes.Sponsor ads:Create Contact Groups Text Messaging on iPhone (iOS 12) 2019Must Read:If you lost data after you updated to a new iPhone, you can always use Gihosoft iPhone Data Recovery to get the data back from the old iPhone or backup.
Follow these instructions:
Step 1: On your Mac, launch the Finder window and then search and access the Music directory.
Step 2: If you can’t find Music directory, then navigate to Devices > Mac > Macintosh HD > Users and then select your user account. From there you will be able to access the Music directory.
Step 3: Once you are in the Music folder, navigate to iTunes > iTunes Media > Mobile Applications folder. All your apps that you downloaded on your Mac will be shown in the Mobile Applications directory, listed as .ipa files.
Step 4: Now simply select and delete the .ipa files of your choice. You can also delete the entire directory in order to delete all the apps quickly.
Mobile Applications

Sponsor ads:
Gihosoft iPhone Data Recovery Free
Free iPhone Data Recovery Software for Windows/Mac
Recover up to 12+ types of files, including contacts, SMS, photos, WhatsApp, Viber, notes, etc.
Restore lost data from iOS devices directly or from iTunes and iCloud backup
Recover iPhone data lost due to iOS upgrade/jailbreak, accidental deletion, device lost or broken
Support all the latest iPhone, iPad and iPod Touch
Both Free and Pro version.
If you lost data after you updated to a new iPhone, you can always use Gihosoft iPhone Data Recovery to get the data back from the old iPhone or backup.You may also like: iphonerecovery.com
If you use android phones, please choose Gihosoft Android Data Recovery.
With Gihosoft Android Data Recovery, no longer afraid of data loss!
Gihosoft RePicvid Free Photo Recovery Software provides a free photo recovery software for windows to help users recover the deleted or lost photo for free.
Jihosoft Android Data Recovery: the best Android Data Recovery software for Windows and Mac to recover deleted contacts, messages, photos, videos, WhatsApp and etc from Android devices.Tips:How to transfer messages from iPhone to iPhone

Tuesday 26 February 2019

How to Use iPhone in Cold Weather?


How to Use iPhone in Cold Weather?


When the iPhone X was released last month, there was a frenzy of excitement. People lined up for days for the release of the latest iPhone. However, users soon began to notice that Apple’s newest hone struggled to work properly in cold temperatures. The most common problems were that iPhone X screens become unresponsive or iPhones turn off in cold weather. However, these issues are not unique to the iPhone X. iPhone users have noticed their devices glitching and losing battery life quickly in cold temperatures for ages.

In fact, in November Apple announced that it would release a software fix to combat this recurring problem. While this is good news, this software fix hasn’t been released yet and, as we are already in the midst of winter, you have undoubtedly been struggling with using your iPhone in the cold weather. So how can you fix an iPhone that turns off in cold weather? Here are six tips on how to use your iPhone when the temperatures are below freezing.


Tip 1. Keep your iPhone from Cold


Tip 2. Turn off iPhone Temporarily


Tip 3. Buy a High-Tech Thermal Protection Case


Tip 4. Replace Your New iPhone with an Older One


Tip 5. Use Apple Watch as an Alternative


Tip 6. Always Keep a Car Charger in Your Car
Tip 1: Keep your iPhone from Cold

Does your iPhone lose battery in the cold? The best way to fix an iPhone not working in cold weather is to make sure your phone never gets cold. You should be safe while inside but when you venture out into the freezing temperatures, put your iPhone in a pocket inside of your coat. Your body heat that’s trapped inside of your coat so close to your phone should keep it warm enough. Make sure that you don’t repeatedly take your phone out of your pocket to use it while in cold temperatures because the drastic temperature changes from the cold outside to the warmth inside your coat can cause the phone to glitch. Also never leave your phone in the car during the cold months- temperatures inside your vehicle can get very low.
Tip 2: Turn off iPhone Temporarily

If you’re venturing outside in the cold but won’t need to use your phone, shut it off! This can preserve battery life, which tends to drain quickly in cold temperatures, and can prevent the low temperatures from causing your phone to glitch, which could result in long-term damage. Upon returning to a warmer environment, take your phone out but wait to turn it on until it has gradually warmed up. If you switch electronics on when in a warm environment after they have been freezing, they can overheat and expand.


Tip 3: Buy a High-Tech Thermal Protection Case

If remembering to turn your phone off when not using it or keeping it inside your warm coat sounds like too much to remember, you can always purchase a high-tech thermal protection case. These cases are specially designed to keep the temperature of an iPhone steady, whether it’s in hot or cold temperatures. Although these cases aren’t cheap, they’re definitely worth it. They’re a simple way to prevent an iPhone from turning off or losing battery in the cold.


Tip 4: Replace Your New iPhone with an Older One

While iPhones have been known to struggle with functioning in cold weather, the newer versions of iPhones are the worst. It wasn’t until the iPhone X came out that Apple even considered creating a software to fix the cold bug problem. If your newer iPhone is shutting off or glitching in the cold temperatures, consider replacing your new iPhone with an older version, which could work better. If your iPhone turns off in cold weather, it’s worth giving this a try.
Tip 5: Use Apple Watch as an Alternative

An alternative to using an iPhone in the winter months is switching to an Apple Watch. While it’s not suggested that you walk around in freezing temperatures with your Apple Watch completely exposed, an Apple Watch worn on your wrist will suffer less damage due to the cold temperatures than an exposed iPhone would.

An Apple Watch screen is made differently than an iPhone screen- the screen of an Apple Watch is made thicker. Additionally, an Apple Watch could be covered by the thick sleeve of a coat, which would protect it, while an iPhone would be held in one’s hand, exposing the device to the harsh winter conditions. An Apple Watch is more convenient than a cell phone in general but could prevent hundreds of dollars in damage if you use it in the winter instead of an iPhone.


Tip 6: Always Keep a Car Charger in Your Car

As mentioned, one of the biggest problems that iPhones face when in cold temperatures is how quickly the battery drains, especially with the iPhone X. If you don’t want to replace your newer iPhone with an older version or take any of the other suggestions, remember to always keep a car charger in your car. If you use your iPhone while out and about in cold temperatures, it will most likely lose battery power quickly. To avoid being without a functioning cell phone, make sure you always have a car charger with you so you can recharge your phone while traveling.

Another reason why this tip is crucial is because of the more life-or-death situation of getting caught in freezing temperatures in your car and you need to ensure that you have a working iPhone. Due to how quickly iPhones die in cold weather, you’ll need to make sure to have your car charger with you so that your phone is always charged in case of an emergency like this.


Summary

iPhones are known to have functionality issues in cold temperatures. However, there are several solutions to this problem. If you own an iPhone, especially a newer version, and are nervous about damage or dysfunction during the winter, you can keep your phone warm, temporarily shut it off, buy a high-tech thermal protection case and always keep your car charger in your car. You can also replace your new iPhone with an older version or temporarily use an Apple Watch as an alternative.

Sponsor ads:

Gihosoft Free iPhone Data Recovery:https://www.gihosoft.com/iphone-data-recovery-free.html

Gihosoft iPhone Data Recovery Free

Free iPhone Data Recovery Software for Windows/Mac

Recover up to 12+ types of files, including contacts, SMS, photos, WhatsApp, Viber, notes, etc.

Restore lost data from iOS devices directly or from iTunes and iCloud backup

Recover iPhone data lost due to iOS upgrade/jailbreak, accidental deletion, device lost or broken

Support all the latest iPhone, iPad and iPod Touch

Both Free and Pro version.

Chuwiには、カスタマイズされたラップトップ、タブレットPC、妥協のない品質、安定性、サポート、パフォーマンスを備えたミニノート pcエクスペリエンスの世界有数のテクノロジーパートナーになることをミッションがあります。


Monday 25 February 2019

How to Delete Podcasts from iPad 2019


How to Delete Podcasts from iPad with Itself


Deleting with your iPad does restrict the number of podcast you can delete at a time. Here are the steps to deleting podcasts:Sponsor ads:Budget and Expense Tracking Apps for iPhone/iPad in 2019

Step 1: Open the podcast app from the iPad home screen.

Step 2: Select podcast series from the podcast section.

Step 3: Swipe across the podcast tile you will like to delete horizontally.

Step 4: Tap on the red delete button that pops up.

And in those simple steps you successfully deleted the selected podcast.
How to Delete Podcasts from iTunes Library


It is important to inform you that unsubscribing from a particular podcast channel is not sufficient to delete the podcast as you can still access them from the sidebar on iTunes. Removing a podcasts is relatively easy and we will show you how to do that in a couple of steps listed below. Here are the steps to take:

Step 1: Go to iTunes and access the podcast views.

Step 2: Choose the podcast you want to delete.

Step 3: Press Delete/Backspace (or choose Edit→Delete) to delete.

After this is done you can delete podcasts from iTunes library.

Don't Miss: How to Download Podcasts with/without iTunes?
Bonus Tip: How to Prevent Podcasts from Downloading New Episodes Automatically

Many lovers of podcasts are accustomed to syncing podcasts on all devices so as to be able to access them whenever we want them. The major problem with this, is that most of the time when a new podcast which we may or may not be interested in is released. It begins to download automatically and as a result taking up space on our devices. Therefore, this article will be outlining steps you can take to prevent podcasts from downloading automatically onto your device. The steps to follow are:


Step 1: Open Podcast app at your iPad.

Step 2: Tap on My Podcasts and choose the podcasts channel you want to disable auto-download.

Step 3: Tap on setting icon and then tab Download Episodes

Step 4: Then select Off.

With this steps it is guaranteed that will never download automatically any new episodes. You can alter this settings for specific podcasts by click on them and changing the setting for them to your preferred choice.Sponsor ads:Speed up USB 3.0/2.0 Transfer in Windows 10
Sponsor ads:Perfect Samsung Smart Switch Alternatives for Data Transfer

Sunday 24 February 2019

How to Download Music and Manager Them Without Using iTunes 2019


How to Download Music and Manager Them Without Using iTunes 2019
The Internet has bееn a mаin ѕоurсе оf muѕiс for mаnу оf thе muѕiс lоvеrѕ in the wоrld. Whеn a реrѕоn knоwѕ whеrе аnd what tо find, he оr she саn get any kind оf muѕiс and digitаl songs thаt are available in the world. Dоwnlоаding оnlinе music to рlау iѕ a grеаt way tо fight boredom аnd tо bе еntеrtаinеd whilе waiting fоr your buѕ tо аrrivе, taking a ridе оn thе trаin or wаiting for a friend аt thе cafe. Although iTunes can be used to download music, many of us choose to use app to download music.
Why do We Like to Use App to Download Music Instead of iTunеѕ

Downloading muѕiс uѕing iTunеѕ involves adding ѕоngѕ tо your muѕiс library оr iPоd. Onе оf thе wауѕ tо dоwnlоаd muѕiс fоr уоur iPоd or iPhоnе iѕ from ITunеѕ, but thеrе are many disadvantages аnd limitаtiоns to thiѕ:


iTunеѕ iѕ known fоr running slowly on many соmрutеrѕ, раrtiсulаrlу on Windоwѕ ѕоftwаrе, and it also ѕlоwѕ down уоur ѕуѕtеm


iTunes consumes great dеаl оf system RAM.


iTunеѕ tаkе away реrfоrmаnсе in оthеr аррliсаtiоnѕ.


Thе truth is copyrighted muѕiс is tоо expensive. Yоu might find оut thаt уоu could hаvе bought another iPhоnе оn the money you would have used to download.


Cоmраtibilitу iѕ оnе оf the mаjоr fасtоrѕ necessary fоr effective dоwnlоаd iTunе is limited. Thе fасt thаt it hаѕ to bе роwеrеd bу a соmрutеr iѕ a big disadvantage whiсh mаkеѕ it vеrу inсоnvеniеnt for thе uѕеr.


Evеrу соmрutеr muѕt be аuthоrizеd and gеt аuthоrizеd еасh year; thiѕ саn оnlу be done оnlу оn fivе dеviсеѕ, and оnlу оnе iPоd per computer.


Part 1: Hоw dо I Use App to Download Music


Part 2: A Good Software to Manage Music – iMyFone TunesMate
Hоw dо I Use App to Download Music

As there are many disadvantages аnd limitаtiоn using iTunes, we still have a lot of ways to download muѕiс. There most useful way is use app to download music.
1 Gооglе Play Muѕiс

Stер 1: Visit рlау.Gооglе.соm/muѕiс

Stер 2: If уоu don't have a сurrеnt account with Google, уоu саn аlwауѕ rеgiѕtеr fоr frее. Altеrnаtivеlу, log-in with your Gооglе'ѕ account.

Stер 3: Once ѕignеd-in, it will take a whilе for аll thе ѕоngѕ (if аnу ѕаvеd in уоur lосаl library) tо bе ѕуnсеd tо уоur dеviсе.

Step 4: Dоwnlоаd frоm Google Plау Muѕiс and Trаnѕfеr to your iOS device.


2 Uѕе Tunее App tо Dоwnlоаd Muѕiс

Stер 1: Dоwnlоаd Tunее APK.

Stер 2: Tap thе dоwnlоаd buttоn аnd in a few ѕесоndѕ, уоu'll have thе inѕtаllаtiоn file on уоur phone, оnсе installed, uѕing thе арр iѕ easy.

Stер 3: Sеаrсh fоr thе ѕоng уоu wаnt tо dоwnlоаd оr liѕtеn via streaming.

Yоu'll ѕее a liѕt of ѕоngѕ thаt meet your ѕеаrсh сritеriа, with infо аbоut the length of thе ѕоng, itѕ wеight аnd ԛuаlitу in kbрѕ.

Step 4: Tар on thе ѕоng of уоur сhоiсе to mаrk it blue. On thе tор bar, twо buttоnѕ will арреаr: one to dоwnlоаd аnd one to рlау.

Step 5: Prеѕѕ thе dоwnlоаd buttоn уоu'll have thе ѕоng downloaded tо уоur Muѕiс folder in a mаttеr of minutеѕ.
3 Two Ways to Dоwnlоаd Frее Muѕiс

Besides using app to download music, there are still some useful methods to download free music.
1 Using iTunes Stоrе App to Download Music

Stер 1: Oреn thе iTunes Stоrе app.

Stер 2: At thе bоttоm оf the ѕсrееn, tар Mоrе > Purсhаѕеd > Music.

Stер 3: Tар "Nоt on This [device]."

Yоu'll ѕее a liѕt of ѕоngѕ thаt meet your ѕеаrсh сritеriа, with infо аbоut the length of thе ѕоng, itѕ wеight аnd ԛuаlitу in kbрѕ.

Step 4: Find thе ѕоng, аlbum, оr muѕiс video thаt you wаnt to dоwnlоаd, аnd thеn tар it.

Step 5: Tap to thе right оf the titlе. The song, аlbum, оr muѕiс vidео dоwnlоаdѕ to your dеviсе.


2 Using Free YоuTubе tо MP3 Converter

Stер 1: Find music fоr your iPhone. Dоwnlоаd, inѕtаll & run Free YоuTubе tо MP3 Converter.

Stер 2: Download ѕоngѕ. Prеviеw a ѕоng if nееdеd.

Stер 3: Trаnѕfеr music tо iPhоnе. Oреn iTunes and аdd new filеѕ tо the library.


A Good Software to Manage Music – iMyFone TunesMate
Sponsor ads:Best Free Video Converter for Windows and Mac

Must Read:If you lost data after you updated to a new iPhone, you can always use Gihosoft iPhone Data Recovery to get the data back from the old iPhone or backup.

Gihosoft Free iPhone Data Recovery:iphonerecovery.com


If you use android phones, please choose Gihosoft Android Data Recovery

Need Help about Apple Password? It’s All in Here


Apple Password Help - Reset Apple Password 2019

If the two-factor authentication is enabled, you can use your iPhone which is logged in to the account (iCloud account) coupled with the device using a login password. The steps to reset your iCloud email Password is as follows:
A Reset It with Two-factor Authentication

The Two-Factor Authentication is one of the Apple’s security feature that they’ve pushed ever since they rolled out the iOS 10 and the macOS Sierra. Both Two-Factor Authentication and inputting your password will still require entering a code which Apple usually sends to your iDevice.


Here are the steps:

Step 1: On the Apple ID page, you will be asked to input your email address and numbers that are associated with the two-authentication.

Step 2: After inputting the correct numbers, there will be lots of options which usually offers to reset your password using another device.

Step 3: If you opt for alert, you should receive an alert which would include system preferences iCloud.
B Sending A Password Reset Email

If you don’t want to use the Two-Authentication, sending a password reset email is your best bet. A password will be sent to you through your other email address which should be associated with your Apple ID.


Here are the steps:

Step 1: From the iforgot.apple.com, you will be given an email and click on the “Continue”.

Step 2: A title of “How to reset your Apple ID password”.

Step 3: Once you get the email, click on the “Reset Now” link and follow the steps to continue.
C Answering Security Questions

You answered some questions when you created your previous Apple ID or when you were setting up your new iPhone. It could be the name of your first pet or your favorite teacher. If answering security questions is what you choose, then you can follow the steps below.


Here are the steps:

Step 1: First, enter your date of birth or other answer.

Step 2: You will then be asked two questions. Answer the questions correctly and you will be taken to the Reset Password Page. Sponsor ads:how to remove cydia
Must Read:If you lost data after you updated to a new iPhone, you can always use Gihosoft iPhone Data Recovery to get the data back from the old iPhone or backup.

Gihosoft Free iPhone Data Recovery:iphonerecovery.com

If you use android phones, please choose Gihosoft Android Data Recovery

Step 3: Now, enter the new Password twice and it’s done.
D Two-step Verification

After a backlash due to the iCloud security, the Two-Step Verification was then introduced. Though this security feature is not new, it can still be used. If you were one of those who had issues with the security when the Two-Step verification was introduced. You used it to open your set up your Apple ID. So, if you remember the 14-character recovery key, then you are good to go. That is why it is always great to have it kept – you don’t want to lose it. Using the Two-Step Verification mode depends on knowing your Recovery key.


Note: Once you change your Apple ID password, you’ve got to update your iCloud settings using any iDevice.


So, there you have it, if you need any Apple password help, using these methods will help you perfectly. You don’t have to worry about anything. Not even a password issue should stop you from enjoying your iPhone.

Friday 22 February 2019

A11 Bionic on New iPhone X/8/8 Plus: Faster than Faster! 2019


When it comes to opening large files, texting, multi-tasking and playing HD videos, Apple has always triumphed over the Android CPU in terms of performance, software parity and efficiency. Why? How can a device with an average of 3GB RAM perform better than one with an average of 4-6GB RAM?

The reason for this is because unlike Android, Apple designs both its operating system and its processor and can integrate both to work perfectly.

If iPhones can be so efficient with older processors, what happens when the iPhone X/8/8 Plus use the A11 Bionic chip?


1: Features and Performance of A11 Bionic on iPhone X/8/8 Plus


2: How to Deal with Old iPhone if Plan to Buy the New iPhones
Features and Performance of A11 Bionic on iPhone X/8/8 Plus

TSMC is developing the A11 processor for the much awaited iPhone 8, iPhone 8 Plus, and the surprised iPhone X. It's much more advanced than the same fin filed-effect transistor process that iPhone 7, iPhone 6s, iPhone SE, and iPad Pro series use.

This amazing A11 Bionic processor would be a significant improvement on the existing 64-bit A10 processor in terms of CPU performance, speed and Graphics. Of course we all know that speed is a major advantage iOS apps have over android apps.
A11 Bionic on iPhone X/8/8 Plus: 20% increase in speed & 40% decrease in power consumption

Taiwan Semiconductor Manufacturing Company (TSMC) affirmed that A11 is built with a 10-nanometer technology. This means a 20% increase in speed and over 40% decrease in power consumption. A second-generation performance controller and customer battery design is applied in A11 Bionic that helps to last up to 2 hours longer between charges than iPhone 7. We expect that the transition to 10 nanometers would most likely mean that the A11 would have more features and functionality than its predecessor.

Of course, A11 Bionic chip on iPhone X/8/8 Plus is faster than the A10 and A10X as well.

This is not surprising because from antecedent, the new processor is usually a better version of the previous chip in terms of power consumption, CPU and Graphics performance.

Fillers from many quarters suggest that TSMC is poised to make 100 million of the A11chip this year. Will that number be sufficient enough for iPhone X/8/8 plus as Apple decides to release it this year? Will the company rake in as much profit with the iPhone X/88 Plus like it did with iPhone 7? These and more questions flood the minds of iPhone enthusiasts.


A11 Bionic on iPhone X/8/8 Plus: Test Scores

The A11 Bionic on iPhone X/8/8 Plus has already been put through Geekbench test and the result is mind-blowing. It scored over 4537 points in the Single core and about 89000 points in the Multi-core test.

The score is quite impressive compared to those of the Snapdragon 835 of Samsung Galaxy S8 which scored about 2059 and 6460 in the single and multi-core tests respectively. It even performed better than the A10 processor with 3505 and 5919 in both tests.

There has been some insight into the performance of the chip. It is being speculated that, the iPhone X/8/8 Plus A11 will also be running on a quad-core processor just like the A10 and would be powered by two high-performing cores running at 2.74GHz and two other energy cores to perform all kinds of tasks.

The trend has always been that the iPad version of the A series chip would have a better CPU performance on a core-to-core than its iPhone counter. For example, the A10X chip was better, and even had more cores than the A10. People wonder whether the A11 would maintain the status quo or change it.
Apple Tenth Anniversary: New Version of Processor

This year 2017 came with a lot of hopes. Apple lovers had predicted by their tenth anniversary, Apple releases a new version of its Processor. Apple was set to do just that. As a matter of fact, Apple designed the layout of the Chip and outsourced the fabrication of its component to TSMC.

TSMC have produced the A11 Bionic processor in April 2017. This didn’t happen because of the back-end process issues. According to ‘Digitimes’, those issues have been resolved and the A11 Processor would soon be released.

TMSC started mass production of the iPhone 8/8 Plus Processor in June 2017 which would also be compatible with the new iPhone X.

The new devicse will come with a 3GB RAM and will be available between September and November. Howbeit, we believe that the iPhone X/8/8 Plus would be faster and more efficient than the iPhone 7. They would be a further improvement on the intuitiveness of ‘Siri’ and data security would not be compromised.
How to Deal with Old iPhone if Plan to Buy the New iPhones

Although all we hear are mere rumors and speculations, it is pertinent that all iPhone lovers brace up for the iPhone X/8/8 Plus and its A11 quad-core processor. Performance, storage and memory capacity as well as speed are a major concern for iPhone users and the reason for poor performance can be traced to the processor. If the test results are were not doctored, iPhone users have nothing to worry in terms of performance and power consumption.Sponsor ads:

Gihosoft Free iPhone Data Recovery:https://www.gihosoft.com/iphone-data-recovery-free.html

Gihosoft iPhone Data Recovery Free

Free iPhone Data Recovery Software for Windows/Mac

Recover up to 12+ types of files, including contacts, SMS, photos, WhatsApp, Viber, notes, etc.

Restore lost data from iOS devices directly or from iTunes and iCloud backup

Recover iPhone data lost due to iOS upgrade/jailbreak, accidental deletion, device lost or broken

Support all the latest iPhone, iPad and iPod Touch

Both Free and Pro version.

If you lost data after you updated to a new iPhone, you can always use Gihosoft iPhone Data Recovery to get the data back from the old iPhone or backup.You may also like: iphonerecovery.com

If you use android phones, please choose Gihosoft Android Data Recovery.

With Gihosoft Android Data Recovery, no longer afraid of data loss!

Must read:Youtube video downloader for pc

Gihosoft RePicvid Free Photo Recovery Software provides a free photo recovery software for windows to help users recover the deleted or lost photo for free.

Jihosoft Android Data Recovery: the best Android Data Recovery software for Windows and Mac to recover deleted contacts, messages, photos, videos, WhatsApp and etc from Android devices.Tips:How to transfer messages from iPhone to iPhone

jihosoft Free iPhone Data Recovery

6 Tips to Fix iPhone Restarts Randomly or Keeps Restarting 2019


6 Tips to Fix iPhone Restarts Randomly or Keeps Restarting

There are some other solutions you can try. They may not work for every device, but if you have not tried yet, they are also good tips to troubleshoot the problem.


Tip 1. Hard Reset


Tip 2. Reset All Settings


Tip 3. Updated Apps to the Latest Version


Tip 4. Pull Out Your SIM Card


Tip 5. Restore iPhone with iTunes (Data Erased)


Tip 6. Contact Apple store
1. Hard Reset

Hard reset is a very effective way to resolve most common problems after iOS 12/11.4/11.3 update. Try to perform this trick and see if you are still experiencing the iPhone restarts randomly issue.

To execute the hard reset, users must hold down both "Power" button and the "Home" button, if they own iPhone 6 or earlier, for at least 10 seconds and let go the buttons when the Apple Logo appears.

Users who own iPhone 7 or 7 Plus, are required to hold down the "Volume Down" button and "Power" button at the same time, for at least 10 seconds and set them loose on seeing the Apple logo appearing on their screen.


If you are using iPhone 8 or later, quick press Volume Up button and then also quick press Volume Down button. Finally, keep hold the side button until you see the Apple logo on the screen.


2. Reset All Settings

This is another method to resolve the iPhone restarts randomly issue after updating to iOS 12/11.4/11.3 and is a well known measure taken when a system settings malfunction. Sometimes bad settings may result in the issue of iPhone restarting randomly and resetting the settings back to factory state may help in resolving the issue. But if you are experiencing a situation where iPhone keeps restarting over and over again, in other words, stuck in a restart loop and you are unable to use it then please ignore this tip.

To perform the method: Open "Settings", move to "General", then tap on "Reset" and finally, hit "Reset All Settings". Enter the passcode, if asked. Your device's settings will now be restored to factory state.


3. Updated Apps to the Latest Version

Updating apps could also sometimes help in fixing up some iPhones issues that occurs due to the installed outdated apps. Update all the apps to the latest version so the outdated settings of the app may not raise any hindrances in the working of the iPhone functions. But if you are facing the iPhone keeps restarting issue, not to follow this tip as you're unable to use your device.


4. Pull Out Your SIM Card

Yes, pulling the SIM Card out of the device too can help in breaking the never-ending iPhone restarting loop. Sometimes, when there is a problem while connecting your iPhone with your wireless carrier, iPhone gets stuck in a strange never-ending restart loop. To tackle this, remove your SIM card from the SIM tray using a paper clip or tray ejector pin supplied with your iPhone and check if removing it has resolved the issue or not. If it resolves the problem, put the SIM card back in and turn the device on. If again the iPhone keeps restarting problem comes back, you may have to restore your iPhone with iTunes or get the SIM card replaced by your wireless carrier.


5. Restore iPhone with iTunes (Data Erased)

Restoring iPhone with iTunes is last solution because restoring iPhone with iTunes will wipe off all your data and settings stored on your device and put it back to factory state. Follow the steps below to restore your iPhone safely if you still would like to try this method.


Launch iTunes and connect your iPhone to the computer with a USB cord.


Tap on your device's name on the left top corner.


Then, hit the "Restore iPhone..." and then tap on "Restore" to confirm that.


After the process completes, restart your device once before using it again.


6. Contact Apple Store

When all the above solutions go futile and the iPhone keeps restarting or still randomly restarts after updating to iOS 12/11.4/11.3, then it would be right to say that it could be a hardware issue. You should walk up to the nearest apple store to get your iOS device repaired by the high-tech team of Apple technicians.

We found all the best possible ways and wrote here to make you out of the problem. Use these tips and see your problem is fixed or not. If you have other tips to fix that iPhone keeps restarting or restarts randomly after iOS 12/11.4/11.3 update, please leave a comment here to help others out.Sponsor ads:

Gihosoft Free iPhone Data Recovery:https://www.gihosoft.com/iphone-data-recovery-free.html

Gihosoft iPhone Data Recovery Free

Free iPhone Data Recovery Software for Windows/Mac

Recover up to 12+ types of files, including contacts, SMS, photos, WhatsApp, Viber, notes, etc.

Restore lost data from iOS devices directly or from iTunes and iCloud backup

Recover iPhone data lost due to iOS upgrade/jailbreak, accidental deletion, device lost or broken

Support all the latest iPhone, iPad and iPod Touch

Both Free and Pro version.

If you lost data after you updated to a new iPhone, you can always use Gihosoft iPhone Data Recovery to get the data back from the old iPhone or backup.You may also like: iphonerecovery.com

If you use android phones, please choose Gihosoft Android Data Recovery.

With Gihosoft Android Data Recovery, no longer afraid of data loss!

Must read:Youtube video downloader for pc

Gihosoft RePicvid Free Photo Recovery Software provides a free photo recovery software for windows to help users recover the deleted or lost photo for free.

Jihosoft Android Data Recovery: the best Android Data Recovery software for Windows and Mac to recover deleted contacts, messages, photos, videos, WhatsApp and etc from Android devices.Tips:How to transfer messages from iPhone to iPhone

jihosoft Free iPhone Data Recovery

How to Share iTunes Music Between iPhones via iTunes


How to Share iTunes Music Between iPhones via iTunes

The first way to share iTunes music between two iPhones is to use iTunes. On the surface, this seems pretty simple: you just transfer your music from one device to iTunes, then from iTunes to your second device. In practice, it’s not so easy and you will probably run into several restrictions. Either way, this is how you do it:

Music from First iPhone to iTunes:

1. Connect your first iPhone to your computer and launch iTunes.

2. Go to “Files > Devices > Transfer Purchases from [device name]”. Then the purchased items will be transferred from your iPhone to iTunes library.


Music from iTunes to Second iPhone:

3. Unplug your iPhone. Plug in the second iPhone and click on the device icon on iTunes.

4. On the left side, click Music where you see it in the list of different types of content.

5. Choose “Music” from the left side. Check the box next to Sync Music.

6. Select the music files that you want to sync. Click Apply.


If you get a message that pops up telling you that this iPhone is associated with another library, you will have to give iTunes permission to delete what’s on the iPhone and overwrite it with the new library. You can’t sync your iPhone with more than one library at a time.

Limits:


When syncing, existing music library on iPhone gets deleted when the new one is added. You can’t add more music without deleting the old music, in other words.


If your second iPhone is associated with another library, when syncing, the second iPhone will be erased.


It only supports to share purchased iTunes music across devices.


iTunes is limited to work with 5 iOS devices.Sponsor ads:


Gihosoft Free iPhone Data Recovery:iphonerecovery.com


Free iPhone Data Recovery Software for Windows/Mac


Recover up to 12+ types of files, including contacts, SMS, photos, WhatsApp, Viber, notes, etc.


Restore lost data from iOS devices directly or from iTunes and iCloud backup


Recover iPhone data lost due to iOS upgrade/jailbreak, accidental deletion, device lost or broken


Support all the latest iPhone, iPad and iPod Touch


Both Free and Pro version.


If you lost data after you updated to a new iPhone, you can always use Gihosoft iPhone Data Recovery to get the data back from the old iPhone or backup.


Top 10 Best FRP Bypass Tools to Bypass Google Account on Android Device 2019


Worth reading:download youtube 1080p


If you use android phones, please choose Gihosoft Android Data Recovery


Jihosoft Android Data Recovery: the best Android Data Recovery software for Windows and Mac to recover deleted contacts, messages, photos, videos, WhatsApp and etc from Android

iPhone Group Messaging Not Working after iOS 11.3 Update? Here Is the Fix


8 Common Tips to Fix iPhone Group Messaging Not Working in iOS 11.3


1. Restart the Messages App


2. Check If You Disabled Group Messaging


3. Delete the Old Group Conversation & Start a New One


4. Turn On & Then Turn Off Airplane Mode


5. Hard Reset iPhone


6. Reset Network Settings


7. Update Carrier Settings


8. Restore iPhone with iTunes
1. Restart the Messages App

The very basic thing you need to try when iPhone Group Messaging is not working is to restart the message application. To troubleshoot it, press the “Home” button twice. Then find the interface of the Messages app and swipe upwards. This way, the messaging app will force quit the app. Now, you can re-launch the app.


If the problem is not solved after force quitting it, then reboot iMessage. For this, open “Settings” and then “Messages” and turn it off. Now power off the device and turn it on. Lastly, again go to “Settings”, then tap “Messages” and turn on the iMessages.


2. Check If You Disabled Group Messaging

Sometimes, for instance when you update iOS, reboot the device etc. there occurs some strange changes in the settings of the device. So, chances are that your Group Messaging is disabled. For this reason, you need to make sure if your Group Messaging is enabled or disabled. Following are the steps to be taken.


Run to “Settings” from the homescreen.


Navigate to “Messages”.


Look for “Group Messages” by scrolling down. Now, check if it is turned on or not.


3. Delete the Old Group Conversation & Start a New One

Here is another way that sometimes works to fix iPhone Group Messaging not working issue. Try to erase the existing group conversation and then attempt to drop a message in the group afterwards. Check if it works or try another fix.
4. Turn On & Then Turn Off Airplane Mode

If iPhone Group Messaging not working glitch still persists, turning on and off Airplane Mode can work as a next resort. To enable Airplane Mode, open “Control Center” by swiping up from the Home screen’s bottom. You will find “Airplane Mode” icon. Tap on it and it will enable. Now tap again to disable it,

Alternatively, you can head to “Settings” and tap on “Airplane Mode”. Tap on the toggle switch to turn it on. Once again tap on it to turn off.


5. Hard Reset iPhone

Hard resetting is good solution for fixing the iPhone Group Messaging not working issue as it’s the proven way to resolve many cases. For hard resetting, the two buttons need to be pressed altogether for nearly 10 seconds until the logo of Apple comes into sight. The buttons are “Power” and Volume Down” for iPhone 7 and later models and “Home” and “Power” button for iPhone 6s and earlier models.


6. Reset Network Settings

Another easy and fast tip to try for getting rid of iPhone Group Messaging not working problem is to reset network settings. This will erase all saved network settings in the device including Wi-Fi networks, Bluetooth settings etc. Here’s how you can follow this method.


Open the lock screen and turn on the “Settings”.


Go to “General” and then “Reset”.


Proceed to the next step by tapping on “Reset Network Settings”.


Enter your passcode and verify your action by tapping on “Reset Network Settings” again.


7. Update Carrier Settings

Updating carrier settings helps improving in network connectivity. Also, not updating it can trouble you by giving phone calls, messaging, voice mail or connectivity issues. Check out the steps to update the carrier settings.


Make connection of your device with Wi-Fi or cellular network.


Now, run “Settings”, tap “General” and then “About”.


The next screen will notify you if you have an update available.


8. Restore iPhone with iTunes

This is a last solution you can attempt. Also, this method will lead to all data loss since restoring wipes away the data. The steps are below:


Begin with launching iTunes and connecting your iPhone to it using a digital cable.


Choose your device appearing on the left hand side in the top corner.


After that, hit “Restore iPhone ” option and select the items you need to restore.


Last of all, click on “Restore” and hang on till the process gets completed.


Once done, your iPhone will restart and you can check if the Group Messaging gets normal or not.


So, these are some of the fixes that you can approach when the Group Messaging on your iPhone is not working after iOS 11.3 update. You can try one of these or maybe you will need to try more if one doesn’t work. We hope you’ll be soon be out of the trouble. If you have other solutions, please leave a comment below.Sponsor ads:

Gihosoft Free iPhone Data Recovery:https://www.gihosoft.com/iphone-data-recovery-free.html

Gihosoft iPhone Data Recovery Free

Free iPhone Data Recovery Software for Windows/Mac

Recover up to 12+ types of files, including contacts, SMS, photos, WhatsApp, Viber, notes, etc.

Restore lost data from iOS devices directly or from iTunes and iCloud backup

Recover iPhone data lost due to iOS upgrade/jailbreak, accidental deletion, device lost or broken

Support all the latest iPhone, iPad and iPod Touch

Both Free and Pro version.

If you lost data after you updated to a new iPhone, you can always use Gihosoft iPhone Data Recovery to get the data back from the old iPhone or backup.You may also like: iphonerecovery.com

If you use android phones, please choose Gihosoft Android Data Recovery.

With Gihosoft Android Data Recovery, no longer afraid of data loss!

Must read:Youtube video downloader for pc

Gihosoft RePicvid Free Photo Recovery Software provides a free photo recovery software for windows to help users recover the deleted or lost photo for free.

Jihosoft Android Data Recovery: the best Android Data Recovery software for Windows and Mac to recover deleted contacts, messages, photos, videos, WhatsApp and etc from Android devices.Tips:How to transfer messages from iPhone to iPhone

jihosoft Free iPhone Data Recovery

How to Upgrade to the Latest iTunes Version

1. How to Upgrade to the Latest Version of iTunes

On a Windows computer:
  1. Launch iTunes.
  2. Look at the menu at the top and click Help.
  3. From the drop-down menu that comes up, click Check for Updates.
  4. Follow the instructions on the screen to install the latest update.
update iTunes on Win
On Mac OSX:
  1. Launch iTunes.
  2. Look at the top of your computer screen and click where it says iTunes.
  3. Click Check for Updates.
  4. Follow the on-screen instructions and install the latest version of iTunes.
update iTunes on Win

2. How to Uninstall Old Version of iTunes and Reinstall on Windows 7/8/10

Way 2: Manually Remove iTunes (May Damage PC If Uncorrectly Done)

1. Go to Start and then Control Panel.
2. Click Programs.
3. Click Programs and Features.
programs and features
4. Uninstall iTunes and related software components in the following order by right-clicking on the program and clicking on Uninstall:
  • iTunes Software
  • Quicktime
  • Apple Software Update
  • Apple Mobile Device Support
  • Bonjour
  • Apple Application Support
  • Any other programs that are related to iTunes or Apple.
On some systems, iTunes might have two versions of Apple Application Support. Be sure to uninstall both versions.
Note: You can type “apple” in the search bar of Programs and Features to check all the related programs are removed or not.
uninstall itunes and components

Second, Reinstall iTunes and Related Components

1. After iTunes is completely uninstalled, restart your computer
2. Download the latest version of iTunes from the official Apple download website.
3. Click on the downloaded file and you should see an installation wizard come up.
4. Follow the instructions and go through the steps of the installation wizard. This will involve agreeing to the terms and conditions, choosing where you want your iTunes folder to be, and a few other things.
5. Click Install.
6. Click Finish when it is done.

3. Remove and Reinstall iTunes and Related Components on Mac

If you have a Mac, uninstalling iTunes is not as easy since it is a built-in application. However, with a bit of extra work, you can also remove iTunes and reinstall it.

First, Uninstall Old Version of iTunes

1. In the Applications folder, locate the iTunes application icon.
2. Right-click on it and choose “Get Info.”
3. Click on the little lock icon on the right bottom corner of the window.
4. Type in the administrator password when prompted.
5. Click where it says Sharing & Permissions.
6. Make sure that “Everyone” is selected in the Read & Write privileges.
uninstall itunes and components on Mac
7. Drag the iTunes application icon from Application folder to the trash.
uninstall itunes and components on Mac

Reinstall Latest Version of iTunes

1. Go to the Apple download website and download iTunes.
2. Right click the downloaded file and choose “Open.”
3. An installation wizard should come up. Just follow the on-screen instructions until the application is installed. (Agree to the terms of service, choose a location for your folder, and so on.)Sponsor ads:
Gihosoft Free iPhone Data Recovery:iphonerecovery.com
Free iPhone Data Recovery Software for Windows/Mac
Recover up to 12+ types of files, including contacts, SMS, photos, WhatsApp, Viber, notes, etc.
Restore lost data from iOS devices directly or from iTunes and iCloud backup
Recover iPhone data lost due to iOS upgrade/jailbreak, accidental deletion, device lost or broken
Support all the latest iPhone, iPad and iPod Touch
Both Free and Pro version.
If you lost data after you updated to a new iPhone, you can always use Gihosoft iPhone Data Recovery to get the data back from the old iPhone or backup.
Worth reading:download youtube 1080p
If you use android phones, please choose Gihosoft Android Data Recovery
Jihosoft Android Data Recovery: the best Android Data Recovery software for Windows and Mac to recover deleted contacts, messages, photos, videos, WhatsApp and etc from Android